Sculpting Freddy Krueger
For my next sculpt, I attempted to recreate a pose from a childhood poster.
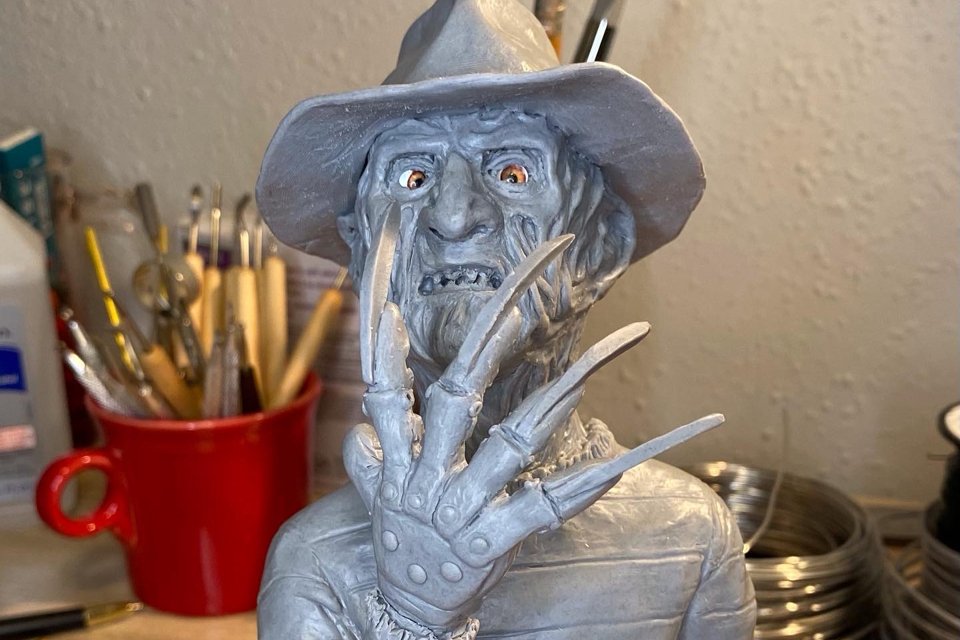
After I wrapped up my first sculpt I wanted to do something that wasn't so academic. I had been bouncing around the idea of doing Freddy Krueger while working on the first sculpt, and thought, what the hell, why not? As a young boy and up until my early teens, I thought Krueger was the ultimate villian. My bedroom wall was plastered with posters and cut outs of Freddy. My Nightmare on Elm Street II: Freddy's Revenge poster was the most meanicing. If you looked at the poster while moving in the room, it gave you the illusion that his eyes were following you. His hallowed eyes, rotten teeth, melted skin, and sadistic threat of his bladed glove seemed an awesome image for recreation.
Freddy's make up in the second film has always been my favorite. It's the most evil and wretched looking of them all in my opinion. While scouring the web for reference images of Freddy, I came across a YouTube video of Kevin Yagher re-casting the appliances from Freddy's revenge. This was from the original molds, now being cast as silicone appliances. Yagher talks a bit about the application for Freddy's Revenge and how he sought to make Freddy more witch-like in appearance. Looking back at the make-up from Freddy's Revenge, I can see it - even down to the choice of his hat. It's bigger, bordering on a witches hat, with a wider brim and taller top. It was interesting to get that inside peak of the thinking and approach behind the make-up. The video also served as a useful source of reference images, and I screenshot many of the views I came to use while sculpting him.

When I left off with the last sculpt, I had some ideas of how I might approach this one. One being separating the head from the body and attaching later. I didn't do that. Also, I noted investigating the measurements for the armature, and scale. I read up more on building the armature, and approached Freddy using the same measurment system. Once again, I did something wrong, or I just don't feel that system jives for me. I had nothing but problems with the proportions. Granted, that could be to lack of experience, but I don't know. Either way, I know for my next sculpt, I'm taking a completely different approach.

I started the armature by wrapping it with foil and wire, thinking this would save on the amount of clay that I needed. Which it would have, but in the end, this one caused me so many problems that I eventually, after ripping the arms off three or four times, tore the head from the body and re-wired it. This scrapped my original plan of making the base a collection of skulls and the souls that Freddy had captured. Unfortunately, the re-wire, while helping me get closer to what I wanted, also threw off the proportion from the head to the body (which seemed off from the beginning as well). In the end, there is a definite "money shot" to this thing, and closer inspection reveals a ginormous head in relation to the body. Any living being with a nogging that big compared to their body would be dragging their head around.
Even though I ripped this one apart a number of times, it was still engaging and a ton of fun. Overall I'm happy with it and think that it looks cool. No, it's not one for casting, but I put it on the shelf and feel proud of it. It will serve as a good reference for my growth. I imagine I will do another Freddy down the road, when I've learned more and honed some skill, likely a different pose with a bit more movement. This pose is fairly stiff.
Some of the Challenges
- The armature and its effect on proportion - I'm going to take a completely different approach on the next one. I'm thinking I will sketch out the next figure and use that to craft the armature.
- The Hat: I never anticipated the hat would be so difficult. It took me numerous attempts to get it to work, and then after staring at it for who knows how many hours, I realized I had the shape of the top completely wrong.
- The shoulders and arms: again and again the arms and shoulders did not feel right. At one point, Freddy looked too beefy, at another the arms too lanky and the shoulders too wide. His torso and chest are still a bit jacked compared to the arms.
- Because the reference image cuts off the arms at the shoulders and shortly below the glove, I had to imagine how it might all fit together. This added to my problems. I tried to rely upon the same skills I would in drawing and the understanding I have of how the human body goes together, but I am definitely a person who likes direct reference.
- The Sweater: I didn't have a great solution for the sweater. When everyting is grey, how do differentiate the green stripes? Also, the texture...I tried a stamp, but it didn't work. I should have planned a better approach to this. In the end I decided on making the lines of the stripes fairly prominent to display the material. I think it works, but can imagine some sort of texture appealing more.


A Little More Commentary on the Hat
I wanted to make a few more notes about the hat, since when I was attempting to do it, some guidance would have been helpful. I tried a number of approaches - from trying to build the hat, in full, separate from the head and then plopping it on. This failed miserably. I also tried forming wire in a circular shape and building the brim around that, with the idea of then adding the top. This failed as well. Frustrated I went and scoured the web for some clue.
What I found was simple, practical, and right there in front of me. It was simply building the shape of the hat right into the head. I think I mentally avoided this approach as I was treating the figure with too much preciousness. Once I globbed the clay directly on Freddy's noggin, and shaped the top, it was "simple". I put simple in quotes, because it wasn't, but at that point I was 80% of the way there.
For the brim, I spread clay out into sheets and then cut out the brim width that I wanted. I then tacked them to the base of the hat, and with some bits of clay and the use of my heat gun, was able to connect it all up. After letting it all cool and harden back to it's base state, I smoothed out the creases with blending tools.
A Few Other Notes
- Monster Clay: This was my first sculpt in Monster Clay. I love it! It's so versatile, and very forgiving. I love the texture and the transition from soft, gooey, pliable, to firm and sculptable with tools.
- Homemade Tools: I'm so glad I made some homemade blending tools. These are so useful and I found myself using them so much. Worth the time and small investment.
- I'm not crazy about rubbing alcohol for smoothing. It leaves a white film which I could only fully get to go away with heat. I need to do some more digging to see what others are using. I've seen so many videos and the sprays the professionals are using doesn't appear to leave this film. Maybe it is something as simple as mineral oil?
- Texturing: I need to work on some texturing resources. I tried making a texture stamp for Freddy's sweater, but it didn't work well. I will have to spend some time building some textures, and getting some assets...sponges for one.
- Sculpt bases: I need better materials for my bases.
I think that summarizes the whole of the project. Learned a lot, had a lot of fun and enjoyment, and was excited to share it with others. Now, on to the next! I'm not entirely sure what I am going to do, shifting back and forth from the thought of doing some general sketching with a focus on movement, to doing an original piece. Maybe I'll do both?

Author: Jason Jacobs
Jason Jacobs is an artist, project manager, and frontend web designer living and working in Boise, Idaho. All words and opinions, etc., are his and do not reflect the positions or beliefs of anyone other than himself.


